DISS JVS
JVS Troubleshooting Guide
Version 1.0
July 23, 2021

1
REVISION HISTORY
DATE
VERSION
CHANGE DESCRIPTION
AUTHOR
07/23/2021
1.0
Published Version
DCSA
2
Table of Contents
OVERVIEW ..................................................................................................................... 3
TROUBLESHOOTING STEPS ....................................................................................... 4
2.1 Refresh the Page .............................................................................................. 4
2.2 Remove CAC/Smart Card ................................................................................ 4
2.3 Update Browser Settings ................................................................................ 4
2.3.1 Internet Explorer ............................................................................................. 5
2.3.1.1 Clear the SSL state. .......................................................................... 5
2.3.1.2 Delete browsing history: ................................................................ 6
2.3.1.3 Update Trusted Sites: ...................................................................... 7
2.3.2.2 Change browser TLS configuration: ............................................ 10
2.3.3 Chrome ................................................................................................... 11
2.3.3.1 Clear SSL State............................................................................... 11
2.3.3.2 Clear Cookies and Browsing Data ............................................... 13
2.3.3.3 Change Browser TLS Configuration ............................................. 13
2.4 Install Required Certificates .......................................................................... 14
2.5 Remove Revoked Certificates ....................................................................... 14
2.5.1 Internet Explorer .................................................................................... 14
2.5.2 Firefox ..................................................................................................... 17

3
1.0 Overview
In order to maintain the highest security standards and optimal performance, the JVS
application is currently supported by certain browsers, operating systems, and security
requirements. To access JVS, users first go to the JVS website (https://dissportal.nbis.mil/diss-
jvs-ui/faces/consent.jsp). When logging into JVS, you may experience access barriers like the
ones shown below. This document provides recommended troubleshooting steps for mitigating
JVS access issues. Please note that depending on your organization’s security restrictions, you
may need to consult your IT department for additional support.
Image 1 Can’t connect securely error page in Internet Explorer
Image 2 404 Error Page
The 404 error appears when the application is not running on the managed servers. Effective
August 2, 2021 users should contact the DCSA DISS Customer Engagements Team (CET),
727-794-7765 or email [email protected] for assistance with this error
message.
4
2.0 Troubleshooting Steps
JVS is currently supported by Internet Explorer version 11, Firefox version 11 and Chrome.
Using these browsers minimizes access issues as they are more compatible with the JVS
application. Note that certain browser settings need to be updated with the correct security
protocols required to access JVS. Follow steps below to troubleshoot access barriers.
Note for Windows Users: Windows 8.1 and 10 are most compatible with the JVS application.
Several users have experienced access issues when using Windows 7 or older versions. To
check for operating system information, reference the Microsoft Support guidance.
Note for Mac Users: There are currently no recommended Mac operating systems.
Note: The following instructions apply to computers with a Windows-based operating system.
2.1 Refresh the Page
Try refreshing the https://dissportal.nbis.mil/diss-jvs-ui/faces/consent.jsp page when any of the
error messages above display:
• Press the F5 key on your keyboard or click the refresh symbol in your browser.
• Refresh multiple times. If the page continues to not load correctly, follow the steps below.
2.2 Remove CAC/Smart Card
Try removing your CAC or Smart Card from your device:
• Close any open browsers.
• Remove your CAC, ECA token, PKI token, or Smart Card.
• Insert your card again then re-open the browser.
• Try logging into JVS again. If you continue to encounter the error page, try the steps in
the “Update Browser Settings” section of this guide for either Internet Explorer , Firefox or
Chrome browsers
2.3 Update Browser Settings
Users may have to update certain settings in their browser in order to resolve their access issue.
Some examples including clearing the cache, deleting browsing history, updating “Trusted
Sites”, and reconfiguring the SSL/TSL setting. This section is divided by instructions specific to
Internet Explorer, Firefox, and Chrome.
5
2.3.1 Internet Explorer
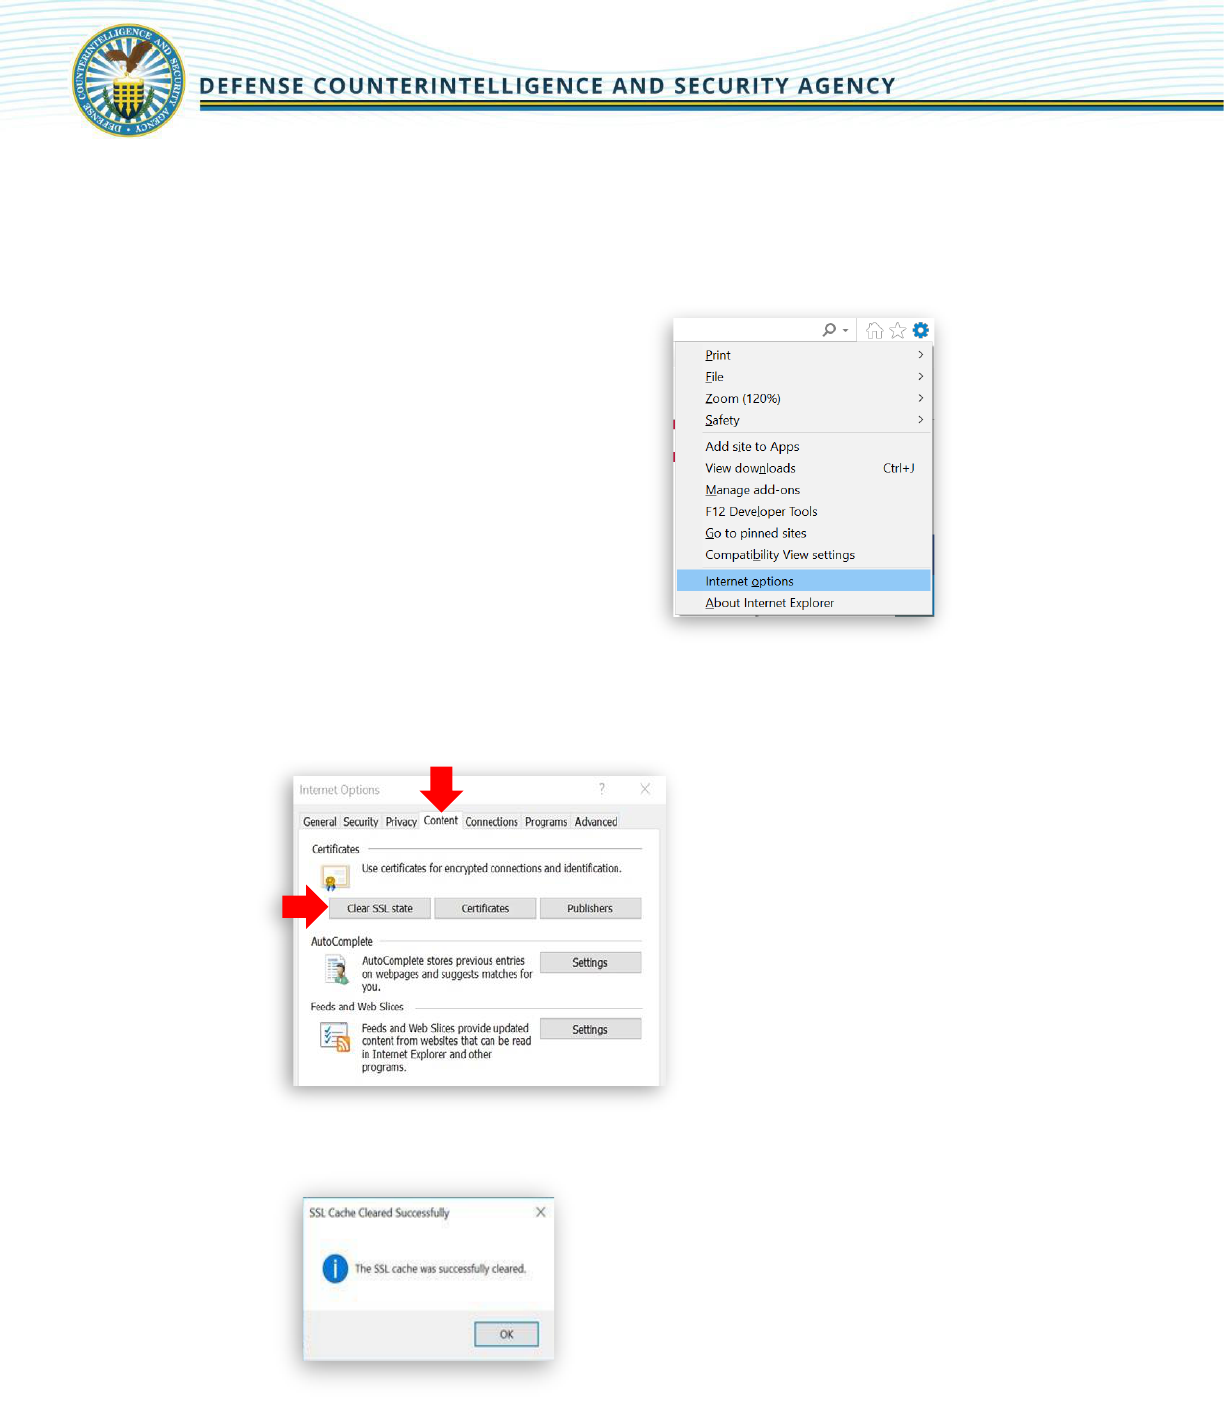
2.3.1.1 Clear the SSL state.
• Open the browser. Click “Tools”, or the gear icon , in the top right corner of the
browser then select Internet Options.
• From the “Internet Options” window, click the Content tab.
• Click the Clear SSL state button.
• Click the OK button on the confirmation message.
• Exit out of the Internet Options window then exit the browser. Re-open the browser.
• Try accessing JVS again.
6
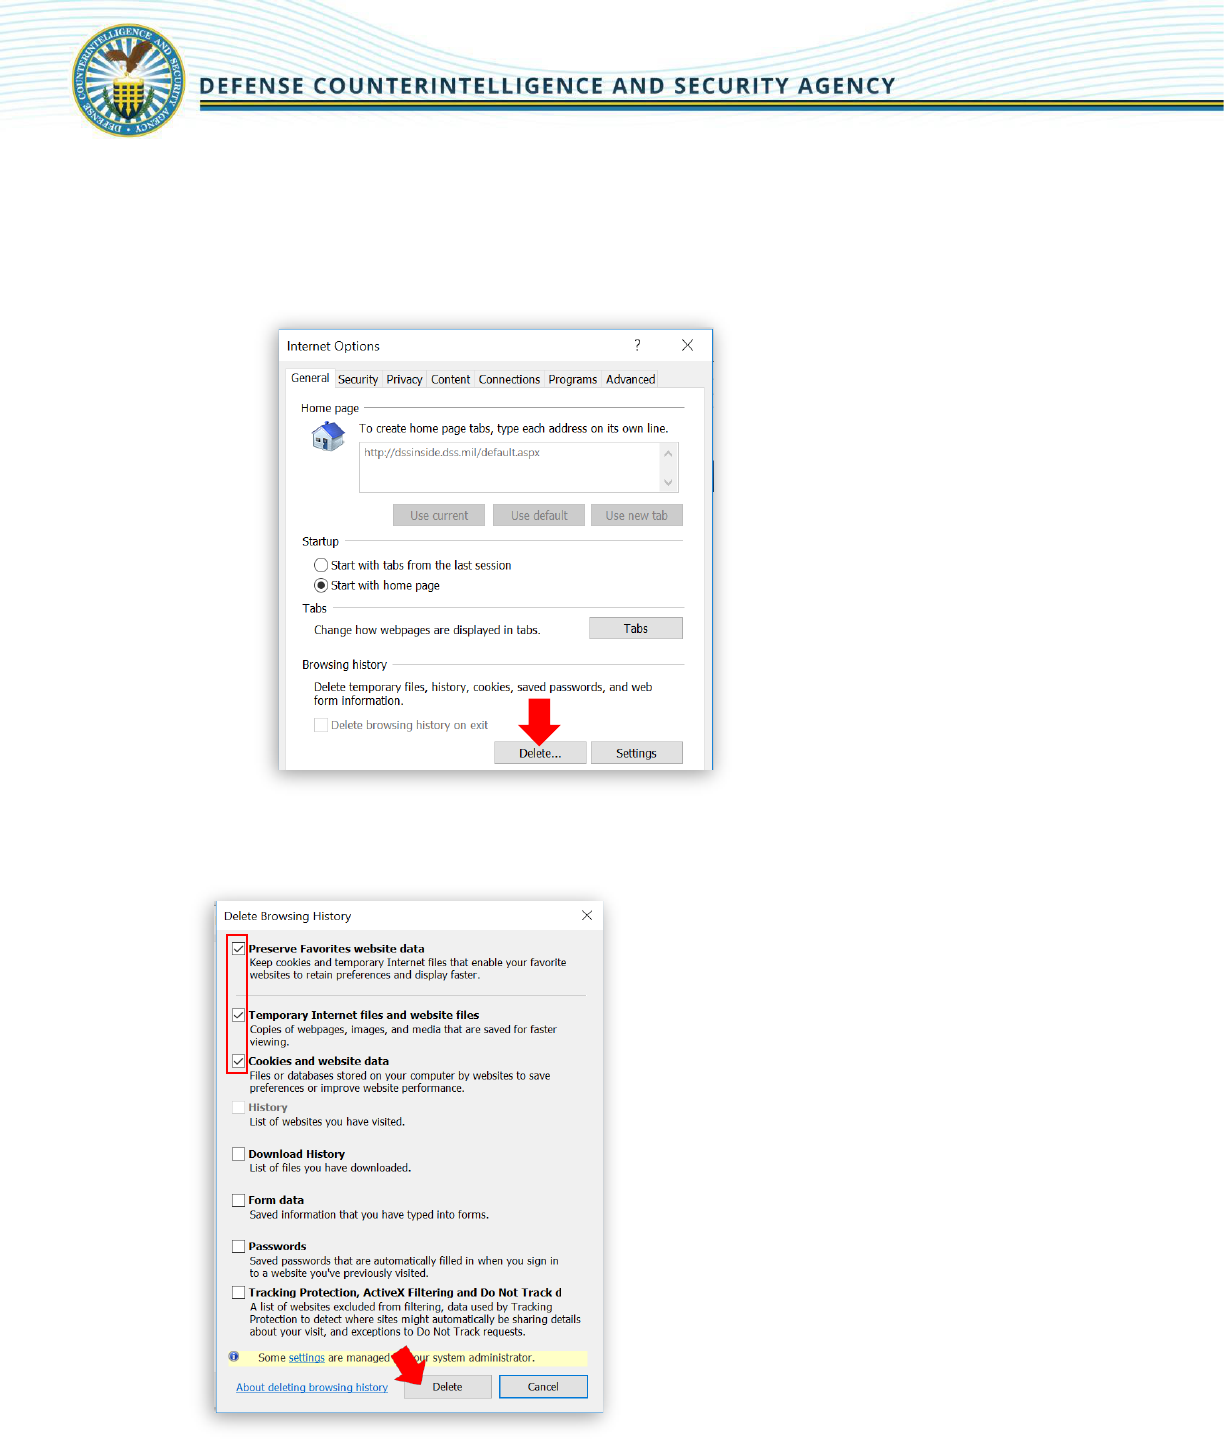
2.3.1.2 Delete browsing history:
• Open the browser. Click “Tools”, or the gear icon, in the top right corner of the browser
then select Internet Options.
• From the “General” tab, click the Delete…button.
• From the “Delete Browsing History” window, select the first three checkboxes as
shown below.Click the Delete button.
• Exit out of the Internet Options window then exit the browser. Re-open the browser.
7
• Try accessing JVS again.
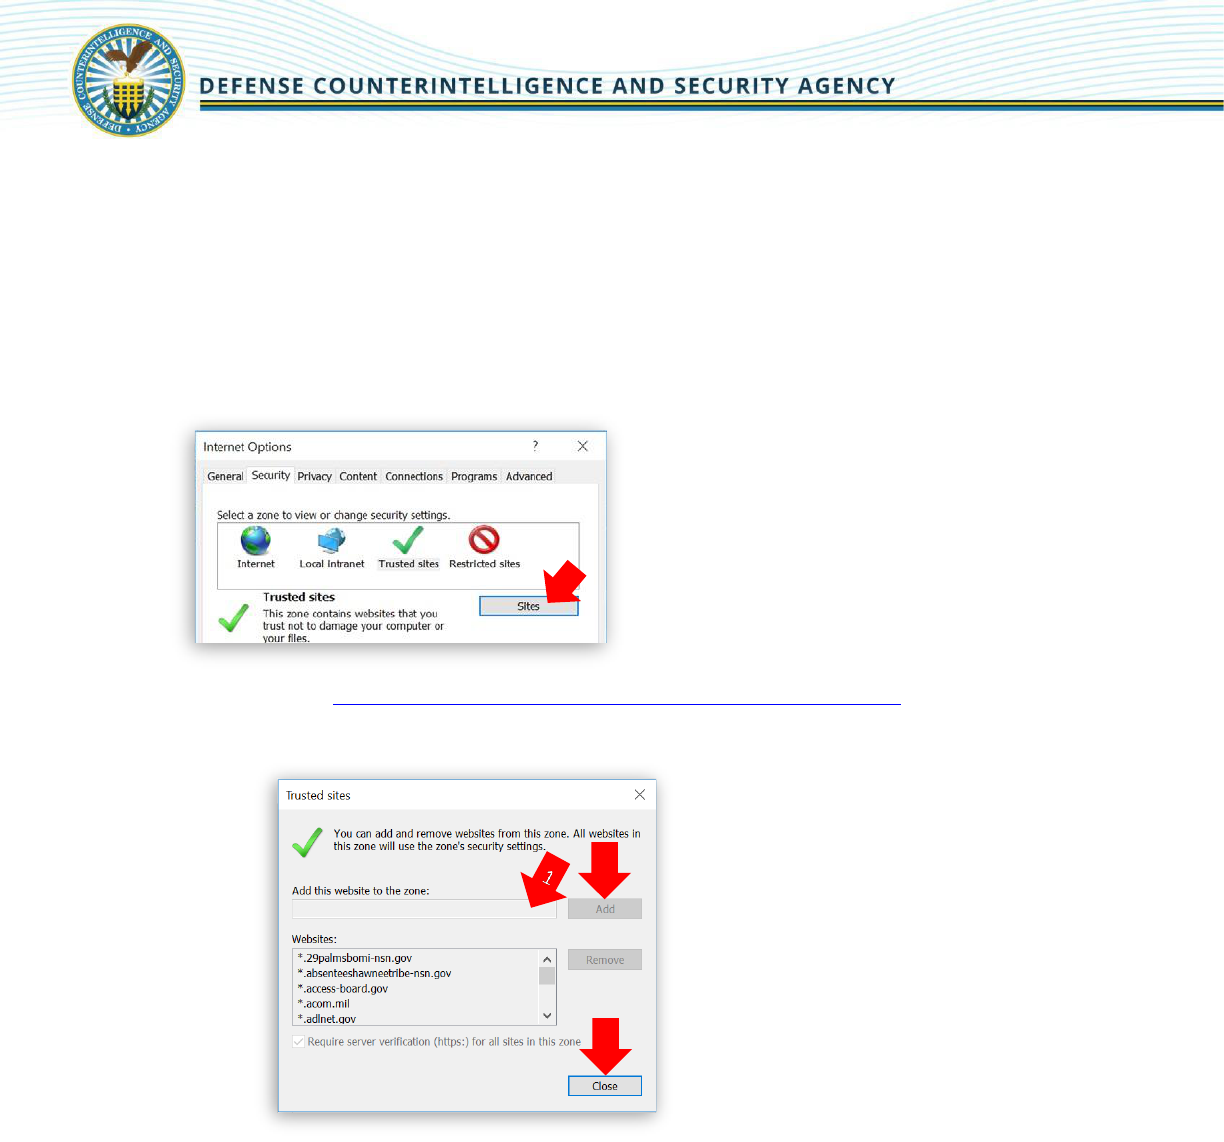
2.3.1.3 Update Trusted Sites:
• Open the browser. Click “Tools”, or the gear icon, in the top right corner of the browser
then select Internet Options.
• From the “Internet Options” window, click the Security tab then click the Sites button.
• Verify or add https://dissportal.nbis.mil/diss-jvs-ui/faces/consent.jsp to the list of trusted
sites. Click the Add button to add the site. Click the Close button when done.
Note: Some users might not have permissions needed to complete this step as
demonstrated by the greyed-out buttons in the screenshot above. If these permissions are
disabled, contact your IT Administrator for additional support.
• Exit out of the Internet Options window then exit the browser. Re-open the browser.
• Try accessing JVS again.
2.3.1.4 Update SSL and TLS criteria:
Click “Tools”, or the gear icon, in the top right corner of the browser then select Internet
Options.
2
3
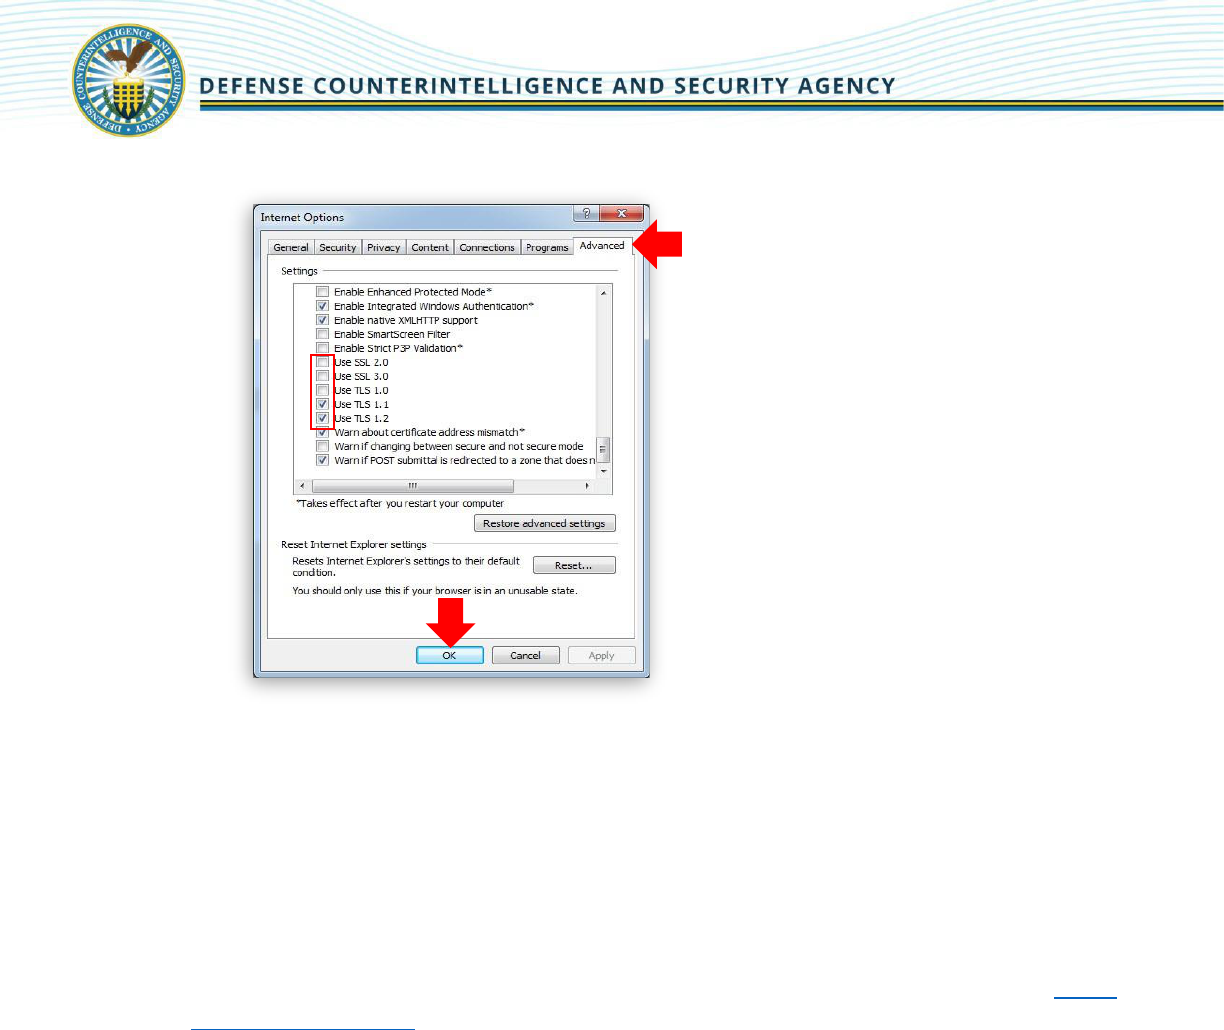
8
• From the “Internet Options” window, click the Advanced tab.
• Scroll to the Security section and uncheck SSL 2.0, SSL 3.0, TLS 1.0, and check TLS
1.1 and TLS 1.2.
• Click the OK button.
Note: Some users might not have the permissions needed to complete this step. If
these permissions are disabled, contact your IT Administrator for additional support.
• Exit out of the Internet Options window then exit the browser. Re-open the browser.
• Try accessing JVS again. If you continue to encounter access issues, proceed to Install
Required Certificates section of this guide.
2.3.2 Firefox
9
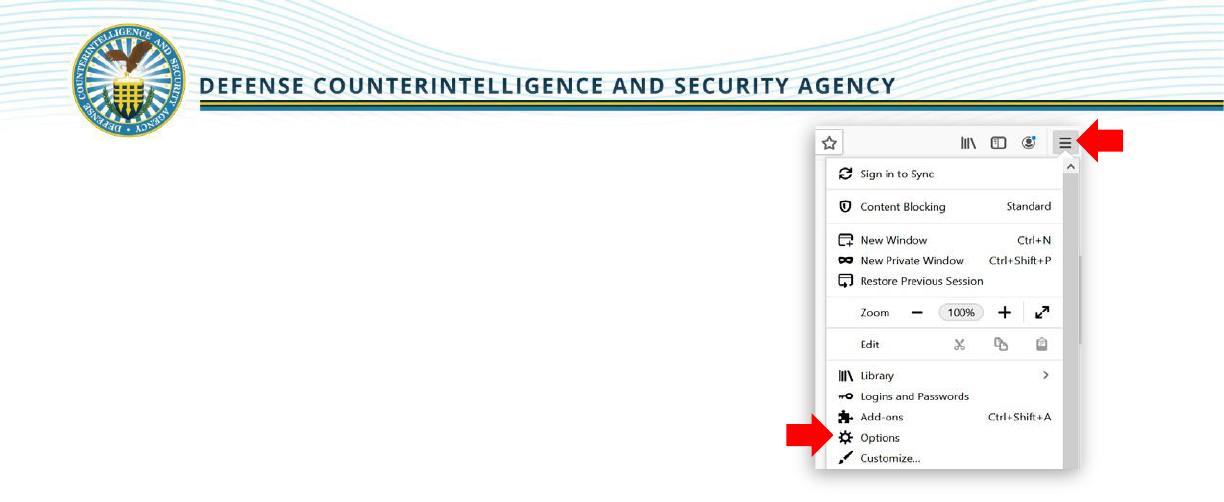
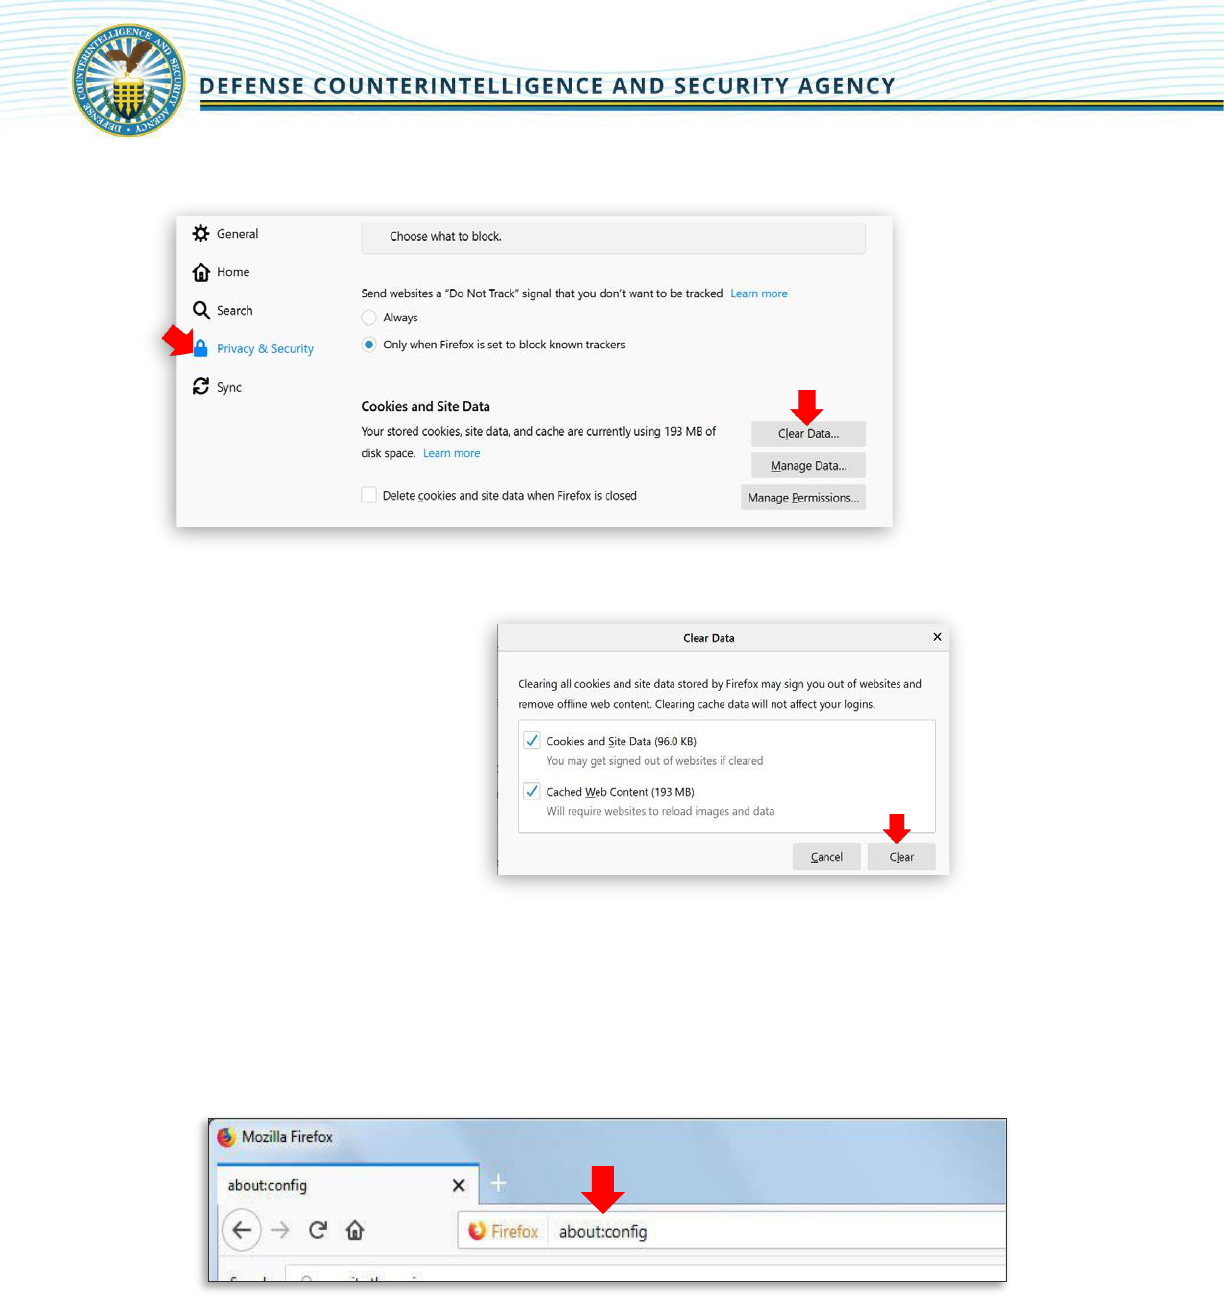
2.3.2.1 Clear Cookies and Site Data:
• Open Firefox - click the Menu button (3 horizontal line
icon) then select Options.
10
• Select Privacy and Security then click the Clear Data button.
• Click the Clear button.
• Exit the browser then re-open the browser.
• Try accessing JVS again.
2.3.2.2 Change browser TLS configuration:
• Open Firefox - in the address bar, type about:config and press Enter.
11
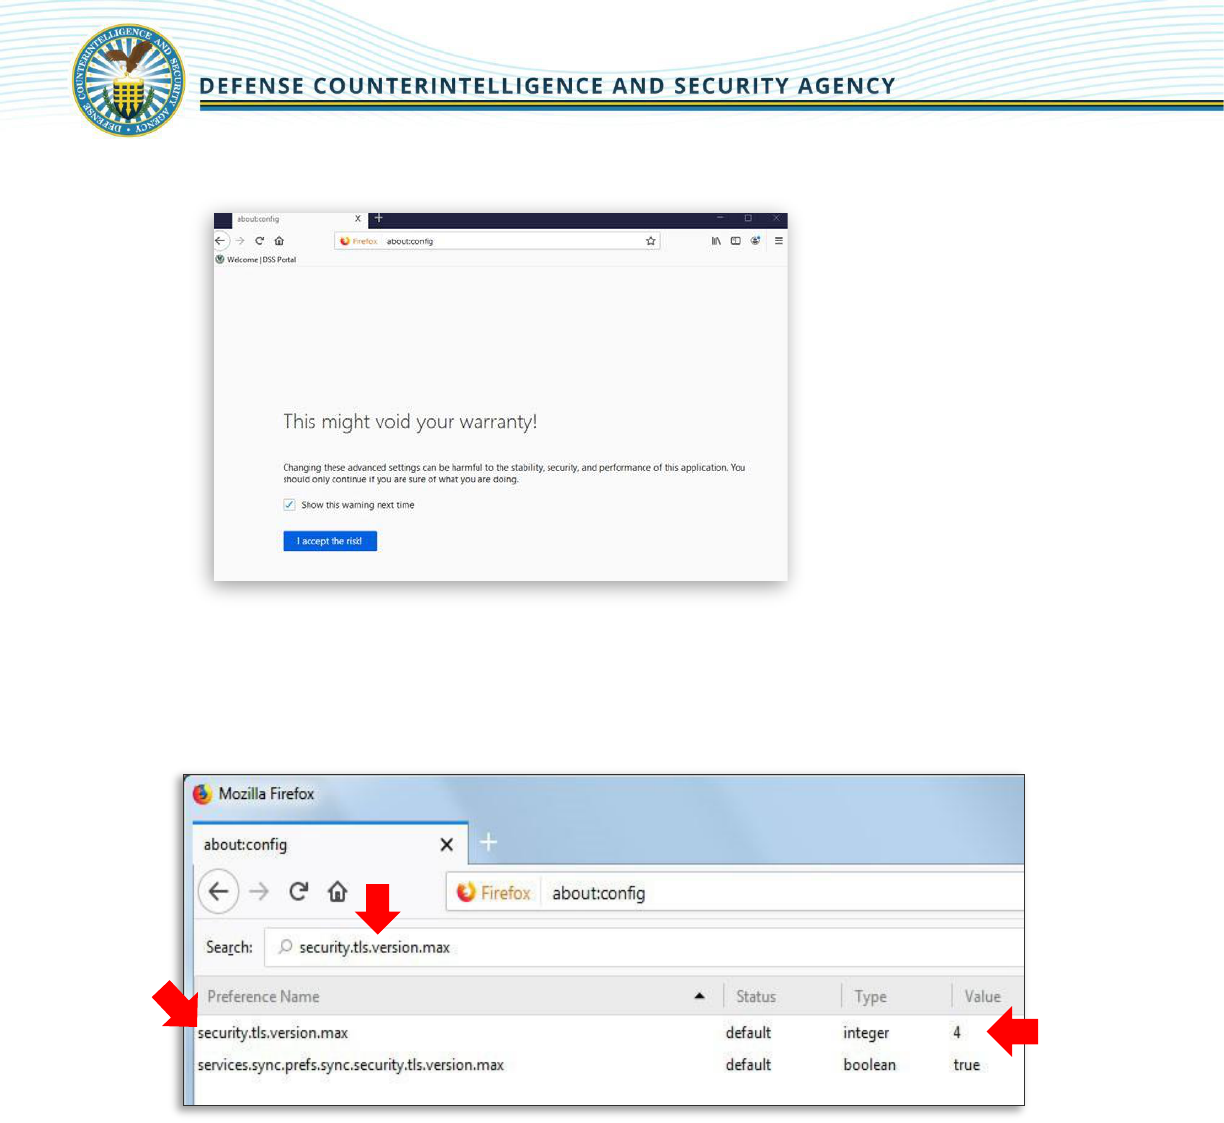
Note: If you receive the message below, click the I accept the risk button to proceed.
• In the Search field, enter “security.tls.version.max”.
• Find and double-click the listed entry.
• Under the Value column, set the integer to 4.
Note: If the issue persists or if you run into a different access issue, proceed to the next
section.
2.3.3 Chrome
2.3.3.1 Clear SSL State
• Select the 3 vertical dots in the upper right and select the Settings icon, and then click
Settings.
• Click Show Advanced Settings.
• Select System, then Open your computer’s proxy settings
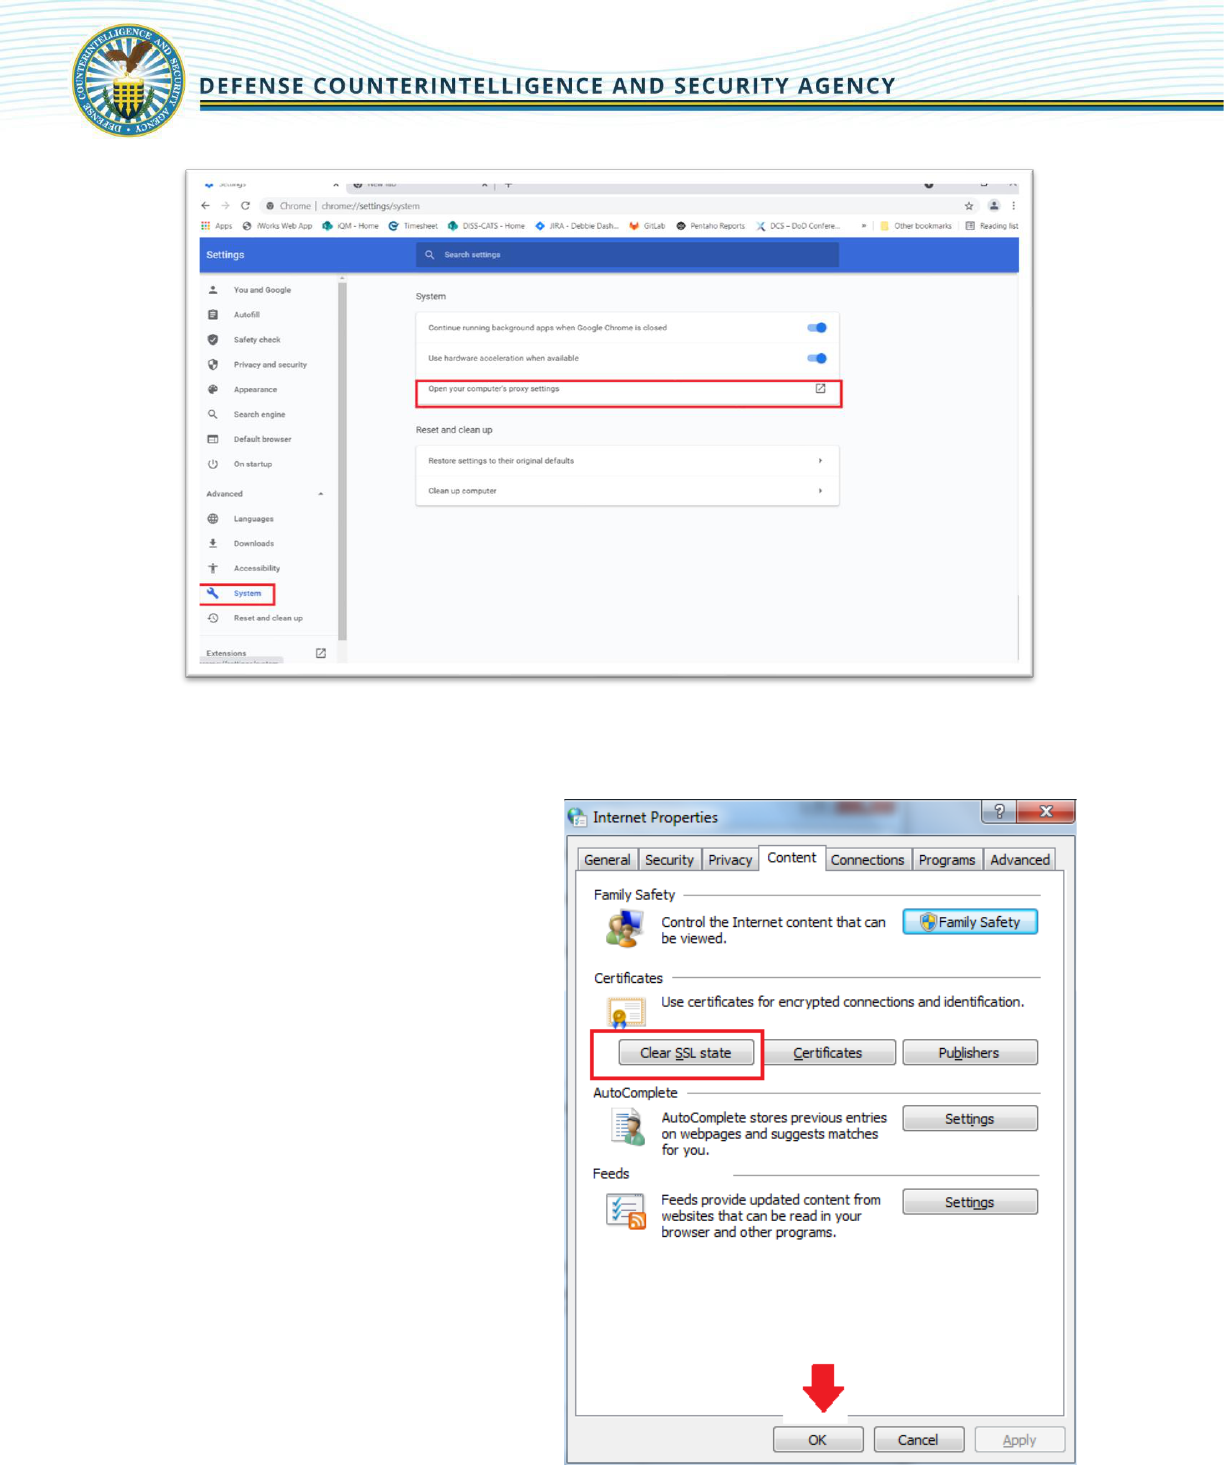
12
• Click Change Proxy Settings. The Internet Properties dialog box appears.
• Click the Content tab.
• Click Clear SSL state, and then
click OK.

13
2.3.3.2 Clear Cookies and Browsing Data
• On your computer, open Chrome. Select
the 3 vertical dots in the upper right and
select the Settings icon, and then click
Settings.
• Click More Tools. Click Clear Browsing
Data.
• At the top, choose a time range. To
delete everything, select All time.
• Check the boxes next to "Cookies and
other site data" and "Cached images
and files.”
• Click Clear data.
2.3.3.3 Change Browser TLS Configuration
• On your computer, open Chrome. Select the 3
vertical dots in the upper right and select the
Settings icon, and then click Settings.
• Scroll down and select Show advanced
settings
• Select System and click Open your
computer’s proxy settings
• Select the Advanced tab.
• Scroll down to Security category, manually
check the option box for Use TLS 1.1 and Use
TLS 1.2.
• Click OK.
14
2.4 Install Required Certificates
While most computers automatically recognize public Certification Authorities (CAs) that are
trusted to validate the identity of secure (HTTPS) websites, many .MIL sites are verified through
private DoD CAs whose certificates require manual installation by a local system administrator.
IT departments within the DoD typically install and update these certificates for their employees
automatically, but there are occasions that updates do not reach all user workstations and a
manual installation becomes necessary. Non-DoD agencies, private sector organizations and
home users do not typically have DoD CA certificates installed on their computers requiring
manual installation.
Follow the instructions below to install the required PKI certificates for DoD websites by
accessing the following link: https://militarycac.com/dodcerts.htm
2.5 Remove Revoked Certificates
2.5.1 Internet Explorer
Now that the new certificates have been installed, you will need to ensure that certain revoked
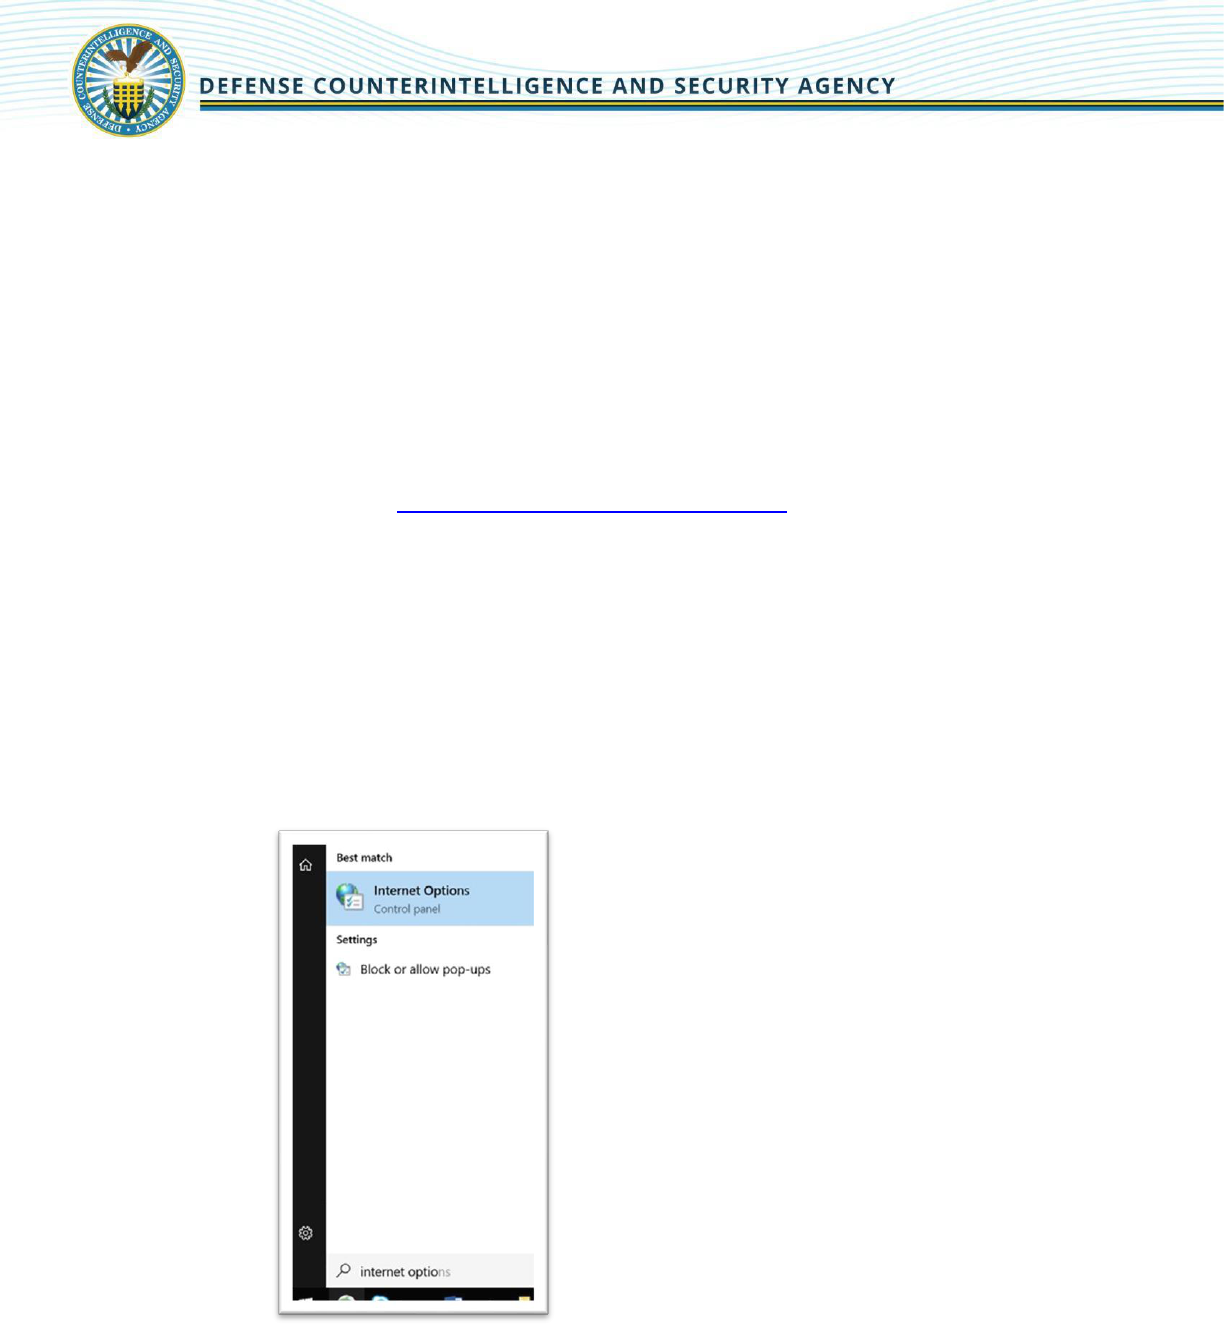
certificates are not reflected in your system. To do so, please click on your Windows Start menu
and type "Internet Options" in the search bar; press ENTER. Windows 10 users may type the
same text in their Cortana ("Ask me anything") search field on the Windows Taskbar.
Note: Alternatively, open Internet Explorer
→
click the gear icon (“Tools”)
→
select Internet
Options.
15
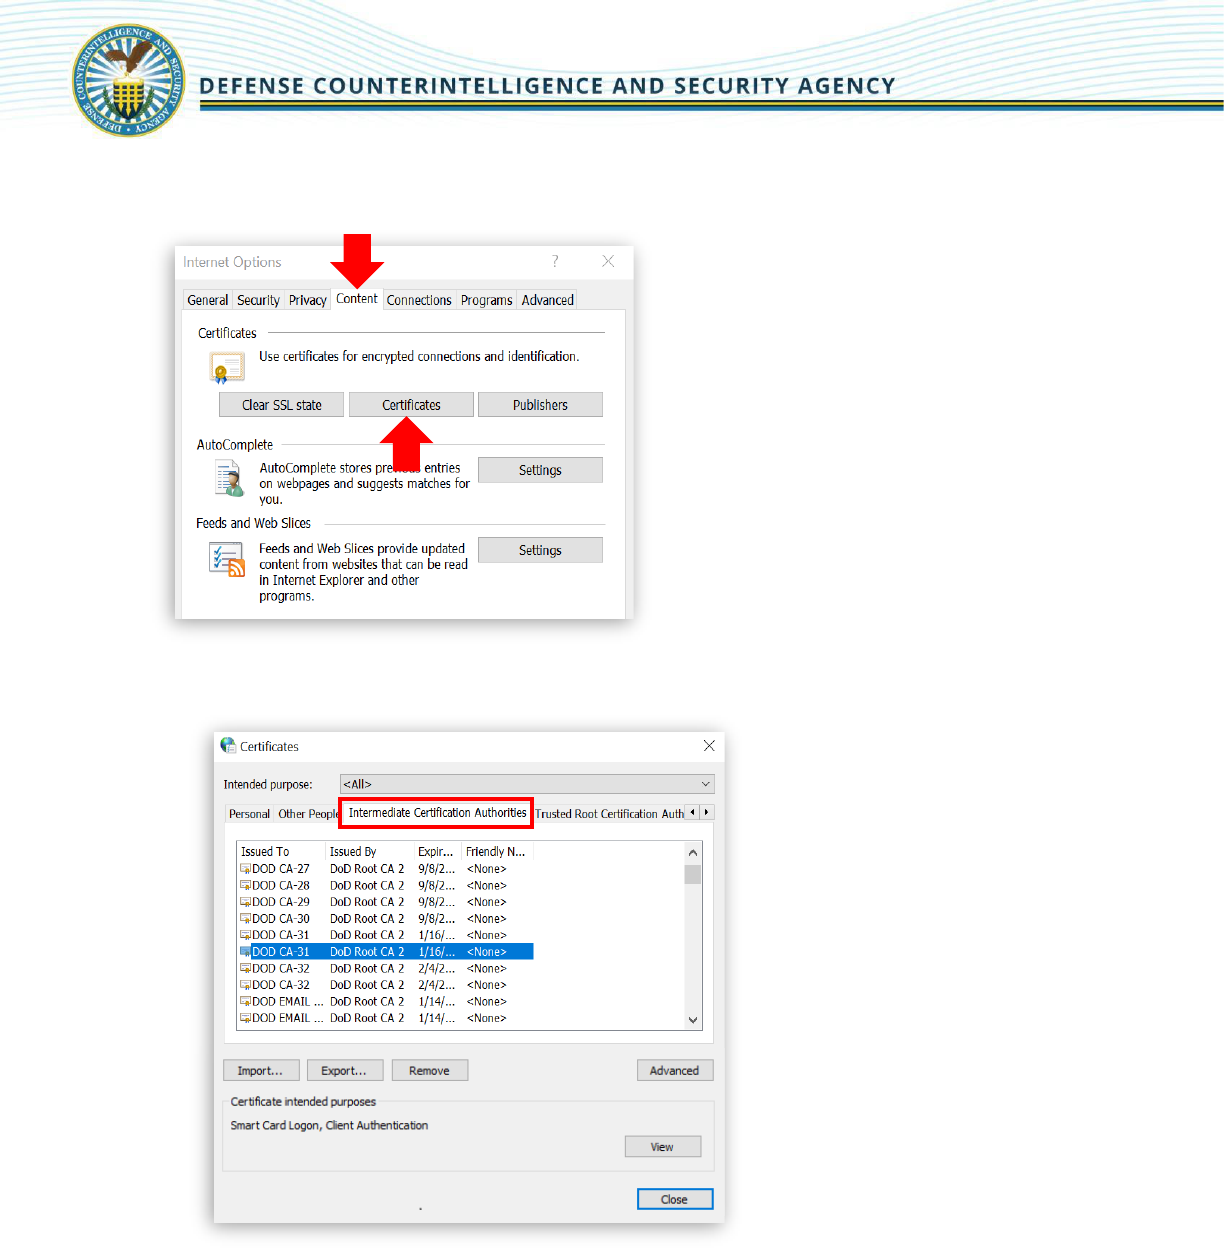
• Click on the Content tab at the top of the Internet Options window and select
Certificates.
• Select the tab for Intermediate Certification Authorities.
• Scroll through the list of certificates, looking under the Issued To column, and ensure
that there are no certificates that reference "DoD Interoperability". If you find any
certificates with this text, select the certificate and choose the Remove button. Select Yes
on the confirmation window to finalize this action.
Note: If your Remove button is disabled, please contact your local IT department; a
system administrator will need to complete this action.
16
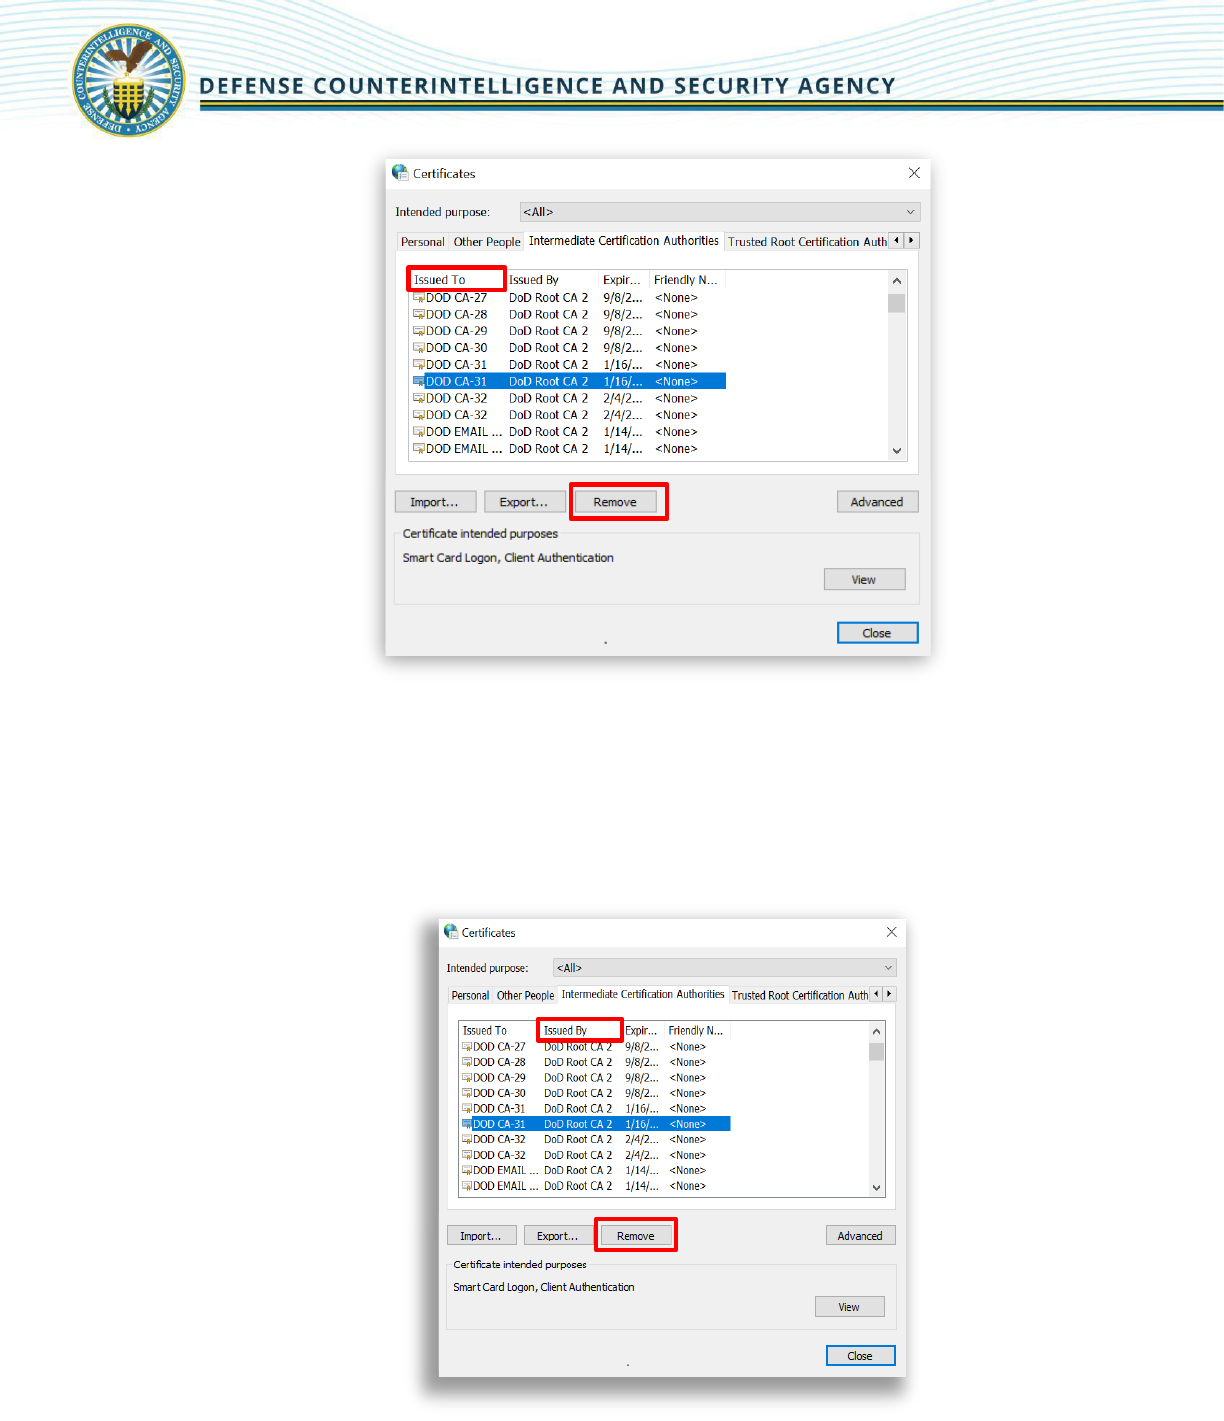
• Scroll through the same list of certificates, this time looking under the Issued By column,
and ensure that there are NO certificates that reference "DoD Interoperability." If you
find any certificates with this text, please select the certificate and choose the Remove
button. Select Yes on the confirmation window to finalize this action.
Note: If your Remove button is disabled, please contact your local IT department; a
system administrator will need to complete this action.
17
• Click the Close button to exit the Certificates window.
• Return to the "Content" tab then click Clear SSL State. Select OK on the confirmation
window. For more information, see the Clear the SSL State section of this guide.
2.5.2 Firefox
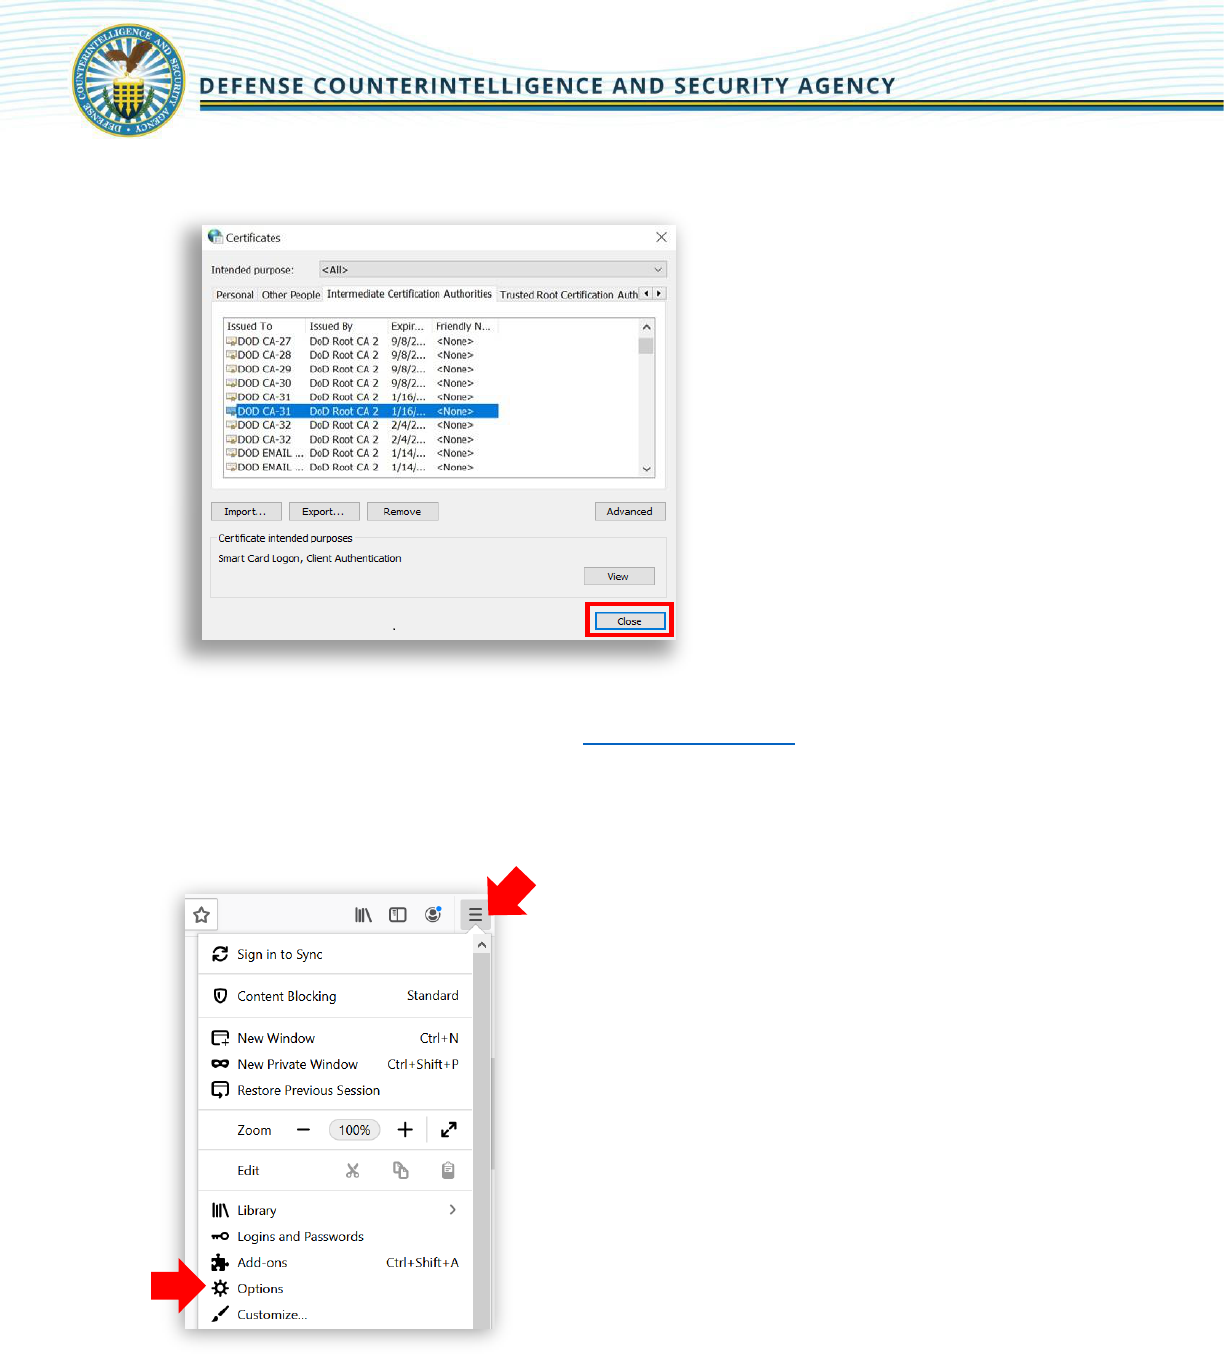
• Open Firefox - click the Menu button then select Options.
18
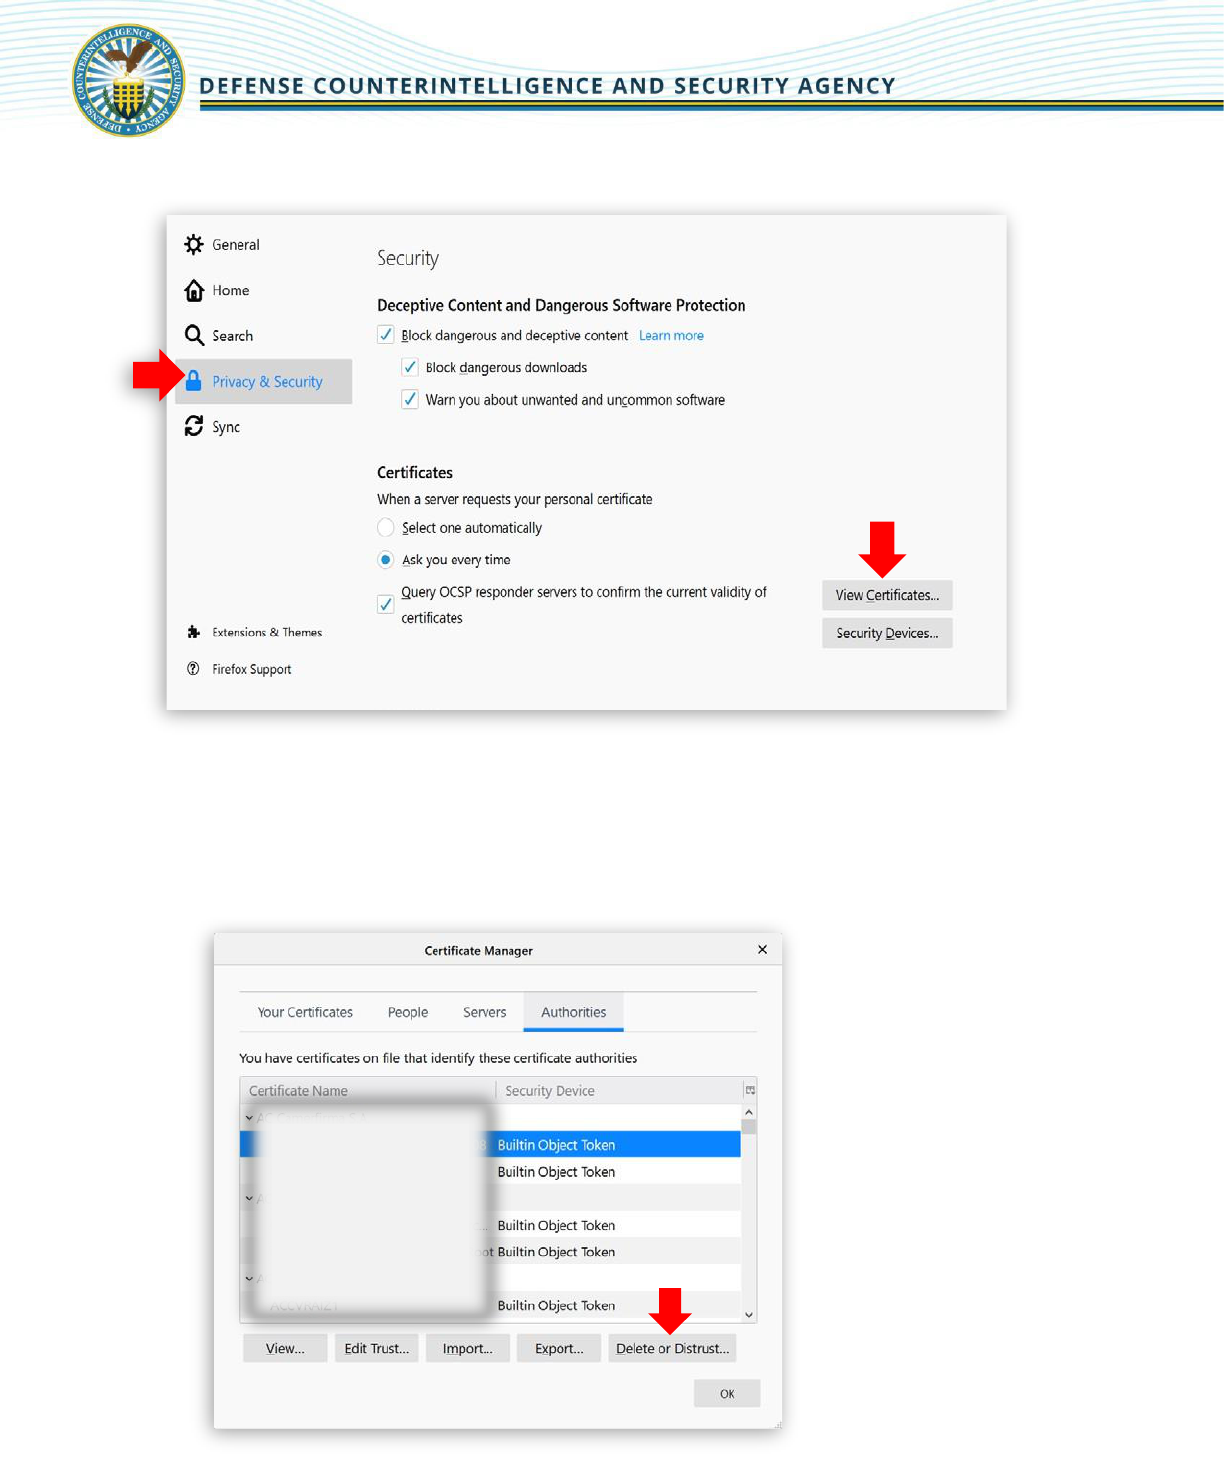
• Select Privacy and Security then click View Certificates.
• From the “Certificate Manager” window, click the Authorities tab.
• Scroll through the list of certificates and ensure that there are no certificates that
reference "DoD Interoperability". If you find any certificates with this text, select the
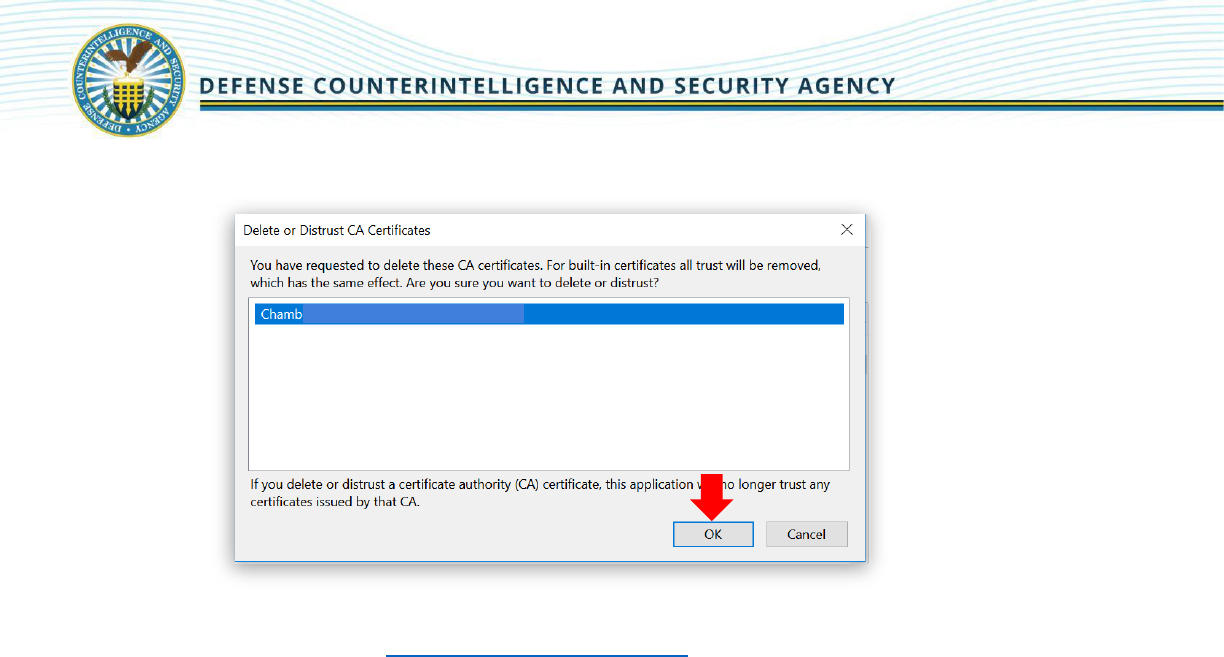
certificate then choose the Delete or Distrust button.

19
21
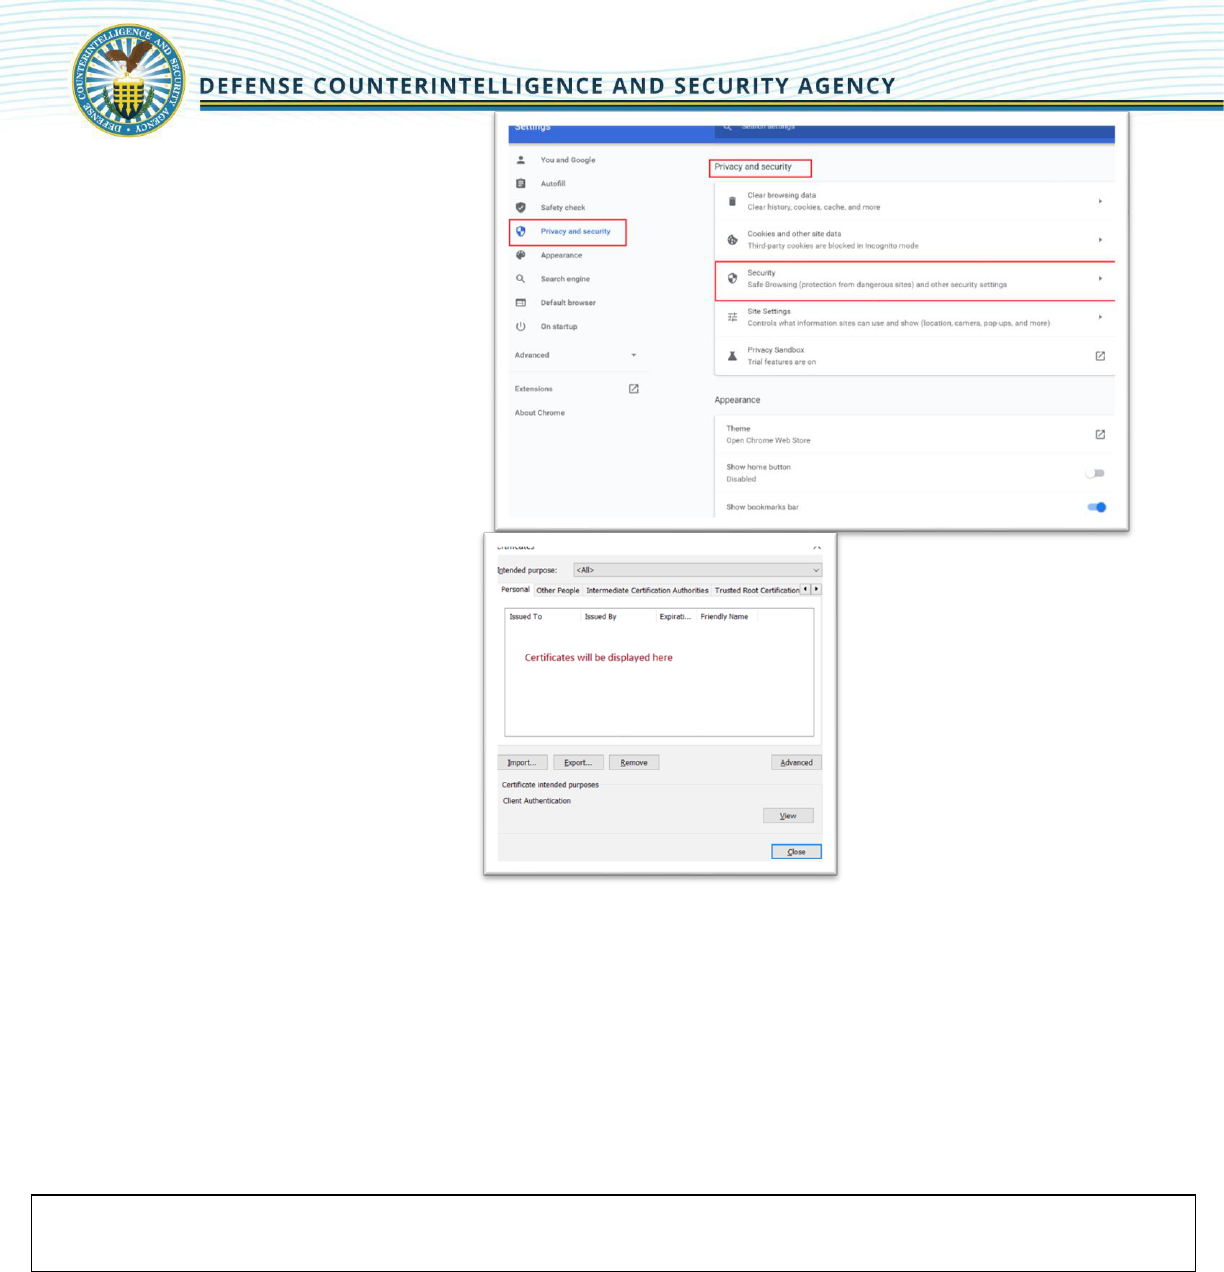
• Select the 3 vertical dots in
the upper right and select
• Settings. Select Privacy
and Security and go to
Privacy and Security
section.
• Scroll down and click on
Manage certificates.
• On the Personal tab, your
expired electronic
certificate should appear.
• Select the one you want
to delete and click
Remove.
For assistance contact the DCSA DISS Customer Engagements Team, 8 a.m. – 8 p.m. EST, Monday – Friday
Toll Free Telephone: 724-794-7765 Email: dcsa.ncr.nbis.mbx.contact-center@mail.mil
